Post
Installing XMPP/Jabber Messaging Server on RPI
Installing XMPP/Jabber Messaging Server
XMPP/Jabber is open simple protocol for messaging. It is very good replacement for previously famous messaging services like ICQ, AIM, MSN... Main disadvantage of these services was that if they was not acessible for some time, you couldn`t do anything... and second, all was proprietary protocols so you could use only official client programs (in most cases full of advertisements). Unofficial clients was not always working like they should. If I can I will always choose open source alternative over proprietary piece of software. In case of instant messaging too. Jabber adresses work in the same way as standard email addresses - it is composed of 2 parts: account@domain.com. You can use some providers which will provide you Jabber account for free (list here), but you can also build your own server. So why not to run XMPP/Jabber server on my Raspberry Pi. I strongly recommend using domain instead of IPs and ensure that RPi is accessible under static IP address. All will work even without this two things but will sooner or later they will cause problems.
More at https://prosody.im/download/
There are more XMPP/Jabber server implementation for RPi. The most used are Prosody and ejabberd. Prosody is much more lightweight but ommit some advanced functions. So I decided to install it.
apt-get install prosody
After succesful installation open its main configuration file
nano /etc/prosody/prosody.cfg.lua
In configuration file add this line, change domain according to yours
VirtualHost "domain.com"
Now there are some other directories you should edit
admins = {"admin@domain.com"} # this account will have rights to administer server through messages
allow_registration = true # set to true or false, if you want that anybody can create account through IM client
welcome_message = "Welcome $user" # message shown to newly registered accounts
registration_watchers = {"admin@domain.com"} # informs admin about new registrations
Now close and save configuration file and restart Prosody
/etc/init.d/prosody restart
Now create a administrator account for prosody manually. In the terminal write
prosodyctl adduser admin@domain.com
On other device install some Jabber client and try to connect to this account. Everything should work. It is not common to use admin account for messaging, create another account, for example via Pidgin.
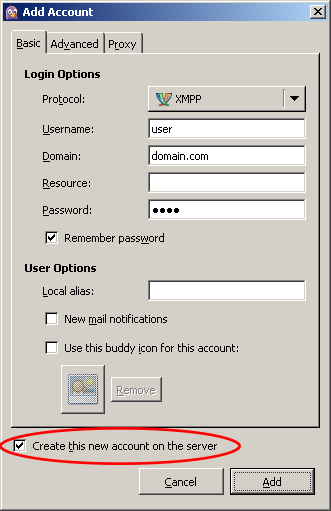
Creating new Jabber account
If you choose to not allow registration of new acconts, you will have to create all accounts in command line. use this commands, they are quite self-explanationary.
prosodyctl adduser user@domain.com # adds a new user
prosodyctl deluser user@domain.com # deletes an existing account
prosodyctl passwd user@domain.com # change password to existing account
Now you should be able to send messages to people from other domains, not only yours.
NOTE: If you are using standard ports for Jabber server you do not have to set this. If you changed default ports, you will have to set SRV DNS records.
_xmpp-server._tcp.domain.com. IN SRV 0 0 5269 hostname.
_xmpp-client._tcp.domain.com. IN SRV 0 0 5222 hostname.
_jabber._tcp.domain.com. IN SRV 0 0 5269 hostname.
There are 3 records, first is port for server to server communication, second is for client to server communication. Third is only for backwards compatibility, set there the same port as in server to server statement.
NOTE2: In client to server communication is used asymetric certificate. Its keys are automaticaly generated at installation, but you can also get validated certificates for your Jabber server from StartSSL for free.